Outside of the technical arena I’m smack dab in the middle of writing a game book. Up to now it’s been distributed as a PDF but the workflow and distribution has been anything but agile. So, the decision was made to turn it into an HTML5 mobile app that we could iterate over and push the updates to customers. On the way to HTML5 we decided to turn the whole thing into an EPUB. We’d have the chapters already broken up into separate HTML files and we’d have a new product. Talk about limiting waste.
Scrivener is an excellent app that we use for outlining, editing, storyboarding, and writing. It exports to multiple formats; PDF, RTF, Word, EPUB, HTML, etc. Scrivener’s EPUB export works really well for quickly getting your book packaged up. But for us there were a couple of issues. The conversion to HTML is handled by libraries from the OS and it does enough funky stuff to make future reuse of the exported markup difficult. Looking at the resulting markup, one time a header is a header and the next it’s a font whose size is set to 180%. That kind of thing makes it really tough to apply sensible custom CSS. But all was not lost.
Scrivener also compiles books to MultiMarkdown which can be transformed into very clean HTML. To leverage the Scrivener-MultiMarkdown combo I wrote a set of scripts called XHTML2EPUB. The scripts convert the Scrivener generated MultiMarkdown file into a standards compliant EPUB file ready for distribution.
What does MultiMarkdown look like?
Here’s a very basic but straight forward example.
## Playing The Game ##The Firefight! Tactical Roleplay Engine requires at least one OPFOR Commander and a small group of players; some playing as the Operators and the rest helping the commander by playing as OPFOR.
The text surrounded by double hash marks are denoted to be a second level header.
When rendered as HTML it looks like this:
Playing The Game
The Firefight! Tactical Roleplay Engine requires at least one OPFOR Commander and a small group of players; some playing as the Operators and the rest helping the commander by playing as OPFOR.
Piece of cake and very easy to work with. We converted the entire project to MultiMarkdown by hand instead of relying on the built-in WYSIWYG tools. You tell MultiMarkdown what you mean the text to look like instead of worrying about font selection and what-not. Beyond making it easier to apply custom CSS, I’ve found that this approach makes it easier to focus on the writing itself. WYSIWYG can be distracting.
Here’s more information on creating a MultiMarkdown document that’s straight from the source.
Setup
Before you can run the scripts there are some things that you have to make sure are installed:
- MultiMarkdown Select the installer for your operating system and have a go.
- Ruby If you’re running OS X or Linux then odds are you already have it installed. If you’re on Windows then have no fear. It’s a straight forward install.
Installing the necessary Ruby bits
From a terminal/command line run the following lines:
gem install nokogiri
gem install uuidtools
Depending on your setup you may have to use the sudo command. For example:
sudo gem install nokogiri
The Workflow
1. Compile your work to MultiMarkdown
In Scrivener select Compile… from the File menu.
Note the document titled Meta-Data. Here is where you can place bits of information useful to Multimarkdown. Make sure this bit is in there:
css: ../Styles/epub_style.css
Under Formatting, at top of the representative text area, add:
# Title #
This tells Scrivener to insert the chapter title as a header element into each chapter’s text. You could do this step by hand but you lose the ability to freely rearrange chapters within Scrivener via drag and drop.
XHTML2EPUB uses this bit of information to do its thing.
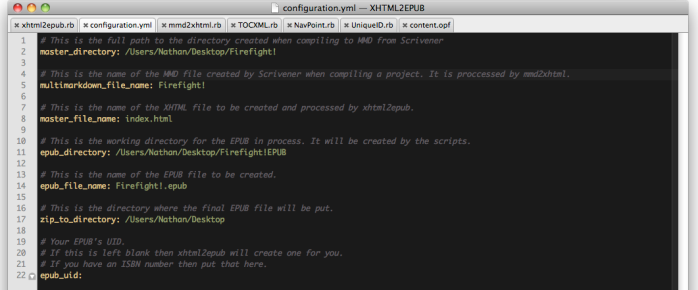
2. Configure XHTML2EPUB
3. Run mmd2xhtml.rb
mmd2xhtml.rb is included as a convenience script to convert the file denoted by multimarkdown_file_name into plain ole XHTML. After this script is run there will be a monolithic XHTML file in the master_directory. It is split into individual chapter files in the next step.
4. Run xhtml2epub.rb
This is where most of the work is done. After you run xhtml2epub.rb you will have a complete working directory for your EPUB with all of the assets; text, and images all in the right place. The script also massages the generated HTML to comply with EPUB standards.
5. Tweak the CSS
Since EPUB is styled with a subset of CSS 2 you can use your favorite editor to tweak epub_directory/OEBPS/Styles/epub_style.css.
Once everything looks good simply run xhtml2epub.rb again and it will scoop everything up and recreate the EPUB file with your CSS changes.


Hi Nathan,
Thanks for placing these scripts in the public domain.
YAML is no longer (was ever?) a Ruby GEM but seems to be part of Ruby. Is that a problem for your scripts?
Peter
Thank you for checking it out, Peter. And for catching that about YAML. I’ll make the edit so as others don’t get confused.
Unusable. There is no gem EPUBFile in any repository
Obviously the project is useable. It got us into three bookstores.
I’m not sure why you are looking for an ‘EPUBFile’ gem. The project dependencies are described in the article. In the configuration.yml ‘EPUB file’ is mentioned twice but those mentions refer to the actual to-be-generated ePub’s filename and directory.
Let me know if I can be of any more help.
I abandoned this for now – didnt have nerves for this 🙂 Too much hassle with different versions of ruby on Mac with RVM, System ruby 1.8.7 and macport ruby 1.9 . It is not me searching for EPUBFile gem, but the program.